


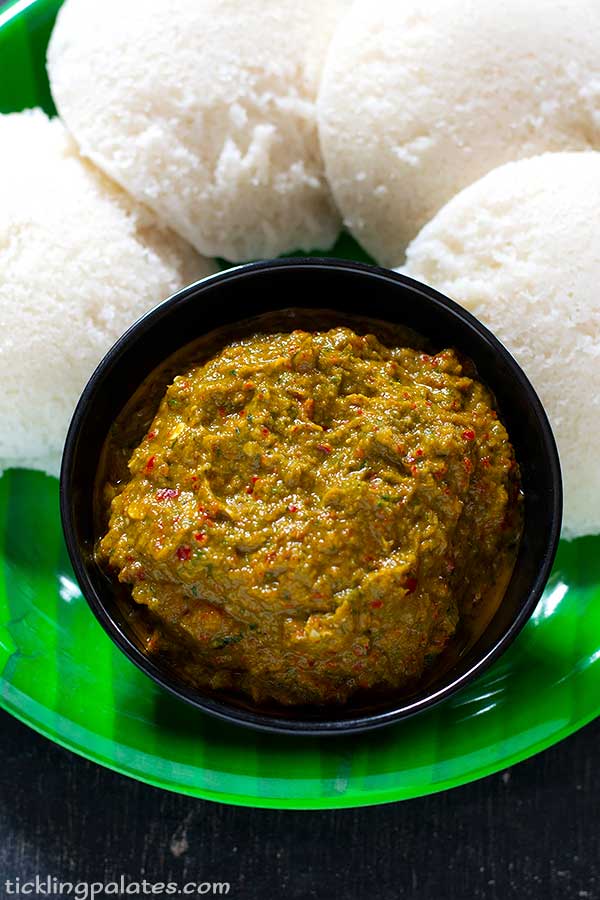
Peanut chutney recipe - Andhra peanut chutney made 2 ways (with and without coconut) that is served as a side dish with idli, dosa and pooris.
This verkadalai chutney or palli chutney is the most loved spicy chutney in our home.
We prefer it very spicy but it can be made mildly spicy also by adjusting and reducing the number of red chillies you use.

More than with idli and dosas, we love to have this chutney with hot pooris.
In our native, peanuts are a premium crop and it is always stored all around the year in our homes.
Our Favorite Video:
So we use peanuts in anything and everything.
It also happens to be our favorite snack to eat anytime.
Though many may say, peanuts are not heart friendly & can make you gain weight easily, which is indeed true,
Moderation is the key, not just with peanuts but with whatever you eat.
Now coming to verkadalai chutney,

Which peanut works better?
Raw, unroasted and unsalted peanuts works the best.
Though you can use roasted peanuts to make this chutney, the texture and taste will be different. Its just not the same.
So it is always better to use raw peanuts and roast them either on stove top or in a microwave just before making the chutney.
Is Garlic optional?
Yes, using garlic in the chutney is optional.
It can be added raw the mixie jar if you happen to like the raw flavor of the garlic.
But if you don’t, since it is just 1 no, you can add this to the pan along with red chillies and roast before grinding.
It is used to add more aroma to the chutney as peanuts are bland in the flavor department.
So you can either add it or skip it which depends on your love for garlic flavor.
Can I skip adding coconut?
Again yes, using coconut is also optional.
Adding coconut increases volume of the chutney and makes it more thick, if you prefer a thick chutney consistency.
So add or skip coconut depending on its availability & preference.
What’s the shelf life of peanut chutney?
Peanut chutney turns sour soon especially during the summer season at room temperature.
So after using it, immediately place it in the refrigerator and use it up within 3 or 4 days.
It will thicken up more but add 1 or 2 tsp water to dilute it before using.

Pro-Tip while making peanut chutney:
You can also make this chutney into a thick thogayal by increasing the quantity of the coconut.
Grind it thick and mix it with rice and eat. It tastes delicious to eat with an appalam or chips.
Love Peanuts, then you can try this
Capsicum Peanut Poriyal
Brinjal Peanut Curry
Curry Leaf & Peanut Idli Milagai Podi
Kathirikkai Verkadalai Kulambu
Homemade Peanut Butter
Peanut Chutney Recipe details below:
Peanut Chutney
Ingredients
- Peanuts - 1/2 cup unroasted
- Whole dry red chillies - 5 to 6
- Tamarind - 1 small marble size
- Garlic - 1 no optional
- Coconut - 2 tbsp grated (optional)
- Mustard seeds - 1 tsp
- Curry leaves - 1 sprig
- Salt - to taste
- Oil - 2 tsp
Instructions
Roast the peanuts:
- To do it on stove top: Heat a pan & roast the peanuts over medium low flame till it becomes crisp.
- This should take 6 to 7 mins and you need to keep tossing often to prevent burning.
- To do it in Microwave: Place the peanuts on the glass turn table and spread it out.
- Press the quick start button 3 times for this quantity, which is 1-1/2 mins at high.
- Once the cooking stops with the beep sound, do not open the door but leave it closed for another 2 mins.
- The peanuts will continue to roast & will become crisp during that time.
- Transfer the roasted peanuts to a plate and let it cool.
Make the peanut chutney:
- To the pan, add 1 tsp oil and dry red chillies.
- Roast for 30 secs till it begins to change color.
- Transfer the cooled peanuts & roasted red chillies to a mixie jar.
- Add garlic and grated coconut, if using.
- Add tamarind, salt and pulse to a coarse powder first.
- Now add water and grind to a chutney consistency.
- Adjust water to how thick or thin you prefer your chutney consistency to be like.
- Transfer the chutney to a serving bowl.
Temper the chutney:
- Heat the same pan with remaining 1 tsp oil.
- When warm, add mustard seeds and let it splutter.
- Add curry leaves and fry for 10 secs.
- Pour the seasoning on to the chutney and mix well.
- Peanut Chutney is ready to be served with idli, dosa or pooris.


ooh,my fav. chutney! looks yummy.