

Homemade Naan recipe without yeast – an easy and soft naan made on stove top with step by step photos.
Though I love eating rustic pillowy soft naans in dhabas, cooked in a tandoor, trust me when I say, you won’t have to go to a dhaba again to enjoy naans again.
These homemade naans are made on stove top and has no yeast. They remain soft for a long time and do not turn into plastic Frisbees that prove a challenge to chew and swallow.
Naans make a hearty and filling meal when it is paired with a sumptuous side dish like this paneer tikka masala or this quick paneer butter masala that gets done in 15 mins. This is how they serve in Restaurants too.
I have used bread slices to make these naan come out pillowy soft. These provide a good substitute for using yeast directly.
Many do not get good quality yeast and some who do not know how to yeast either kill it or do not activate it enough to get well raised dough.
This method will be helpful for people who do not want to use yeast. But in case if you are allergic to yeast, then skip the part and continue with the recipe. You will still be able to make dhaba style naan right in the comfort of your kitchen.
 Notes before making Naans:
- I have used all purpose flour. But you can also use whole wheat flour and if doing so, use it in the ratio of 3 parts Flour and 1 part wheat flour.
- Generally 50% of liquid is required of the amount of flour you use. The dough should be loose.
- Use fresh bread slices for a good result.
- Using milk will not only give good texture but also taste great.
- The yogurt has to be fresh or only slightly sour. If its too sour, the dough will also turn too sour upon resting.
- If you are going to serve naans later, stack them one on top of the other and roll it in a clean kitchen towel.
Step wise instructions for Homemade Naan Recipe without yeast:
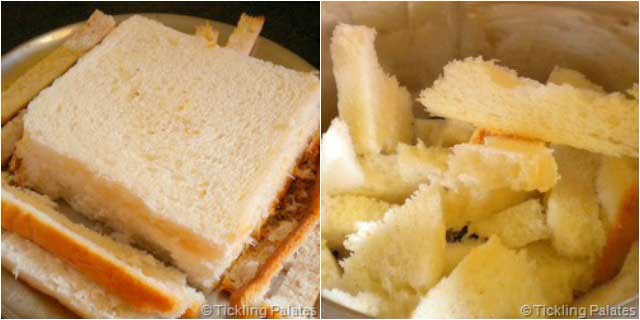
1. Stack the bread slices and trim the brown edges from all the sides and roughly tear them into pieces.
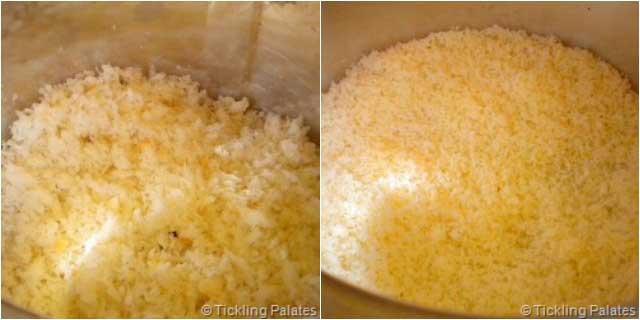
2. Place the torn bread pieces in a mixie jar and pulse it till resembles bread crumbs and transfer to a wide mixing bowl in which you are going to knead the dough.
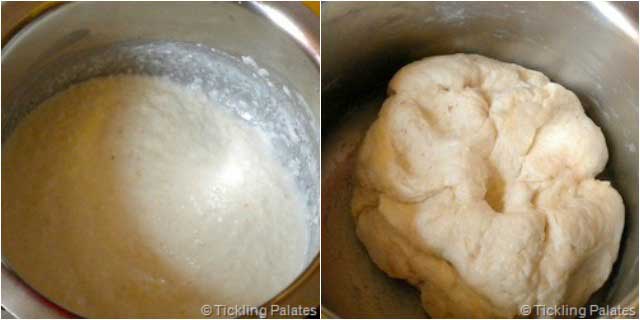
3. Add sugar, baking soda, yogurt and milk. Whisk well and keep aside to let it rest for 1/2 hour.
4. To this mixture add flour, salt and knead into soft and pliant dough. If the dough is sticky add little flour. Grease your palm with oil and knead lightly. Smear oil all around the dough and close with a lid. Let it rest for at least 3 hours.
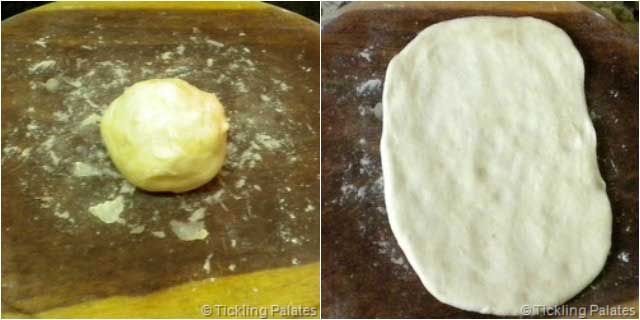
5. Pull an orange size of dough. Sprinkle flour on the rolling board.
6. I did not use a rolling pin but patted the naans with my hand as the dough will be very elastic and soft. Do use a rolling pin and form any shape you prefer. I have an oval shape here. If using onion seeds, sprinkle some on top and gently press for it to stick to the naan.
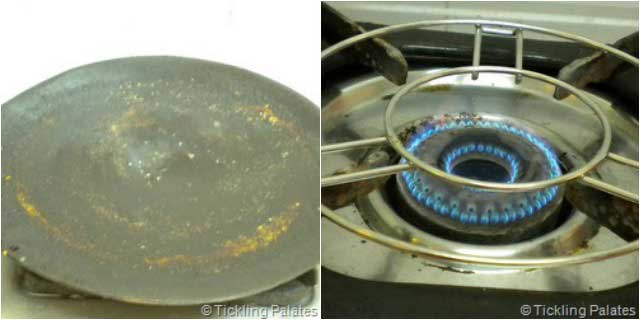
7. Place the tawa or a heavy girdle in the big burner and a mesh over the other burner of the stove.
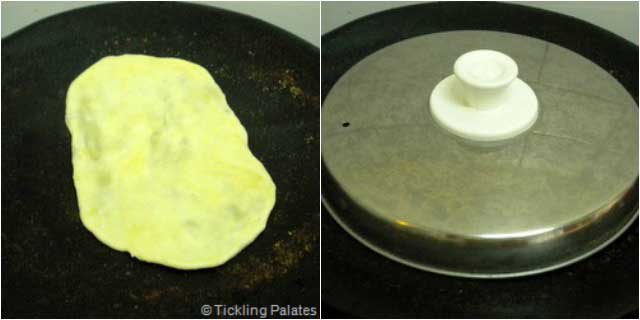
8. Sprinkle water onto the hot tawa and immediately place the naan over the sizzling water and close with a lid.
9. The water will make the naan to stick to the tawa thereby giving it a smoky flavor as there is no way for the steam to escape. The flame should be high. Do not cook over low flame.
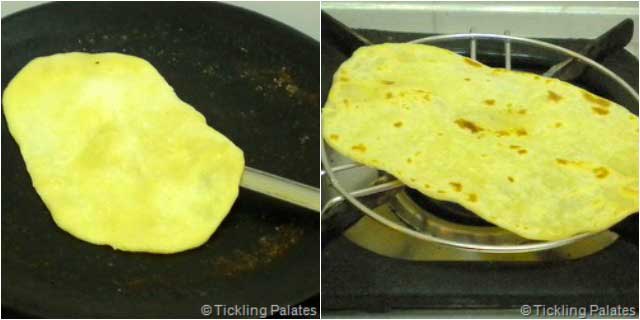
10. Cook for a minute and insert a spatula under the naan to release it and flip it on to the mesh with the cooked part facing top to cook it directly over the flame. The uncooked part should be facing the flame.
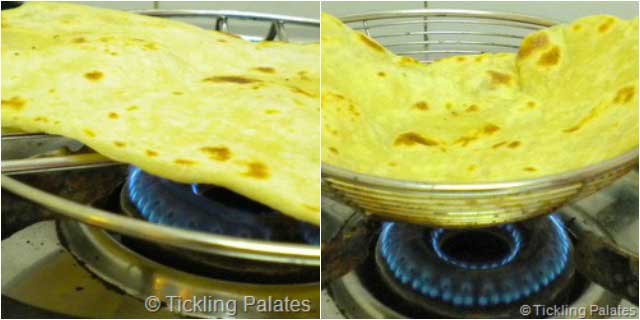
11. Cook over high flame and transfer to a plate. Continue with the rest of the dough.

Homemade Naan recipe without yeast on stove top is ready. Serve hot with any side dish of your choice. You can check out this Butter Naan which is another variation.
DID YOU TRY THIS RECIPE?
Share it on Instagram, tag @ticklingpalates and hashtag it #ticklingpalates or you can also share it on ticklingpalates FB Page.
Homemade Naan recipe without yeast on stove top details as follows:

Homemade Naan Recipe without Yeast on Stove Top
Ingredients
- All purpose flour – 2 cups approx.
- Fresh Bread slices – 4 nos
- Yogurt / curd – 1/2 cup
- Baking soda – 2 pinch
- Milk – 1/2 cup
- Onion Seeds or Kalonji - 2 tsp (optional)
- Sugar – 2 tsp
- Salt – to taste
- Oil – 2 to 3 tsp
Instructions
- Trim the brown edges from all the sides of the bread and roughly tear them into pieces.
- Place the torn bread pieces in a mixie jar and pulse it till resembles bread crumbs and transfer to a wide mixing bowl in which you are going to knead the dough.
- Add sugar, baking soda, yogurt and milk. Whisk well and keep aside to let it rest for 1/2 hour.
- To this mixture add flour, salt and knead into soft and pliant dough. If the dough is sticky add little flour.
- Grease your palm with oil and knead lightly. Smear oil all around the dough and close with a lid. Let it rest for at least 3 hours.
- Pull out an orange size of dough. Sprinkle flour on the rolling board.
- Roll out using rolling pin or gently pat with your fingers to your desired shape which is either a circle or oval.
- If using onion seeds, sprinkle some on top and gently press for it to stick to the naan.
- Place a tawa or a heavy girdle in the big burner and a mesh over the other burner of the stove.
- Sprinkle water onto the hot tawa and immediately place the naan over the sizzling water and close with a lid.
- The water will make the naan to stick to the tawa. The flame should be high.
- Cook for a minute and insert a spatula under the naan to release it.
- Flip it on to the mesh with the cooked part facing top to cook the other part directly over the flame. The uncooked part should be facing the flame.
- Cook over high flame and transfer to a plate. Continue with the rest of the dough.
- Homemade Naan without yeast on stove top is ready to serve.
wow this is good.. i make more like maida roti but on tawa. never used mesh.. i think ur way is good though
You floored me Radhi!! I ll never look at naan the same way again
This looks super good, tasty Naans at home. Thanks for sharing the recipe & the different variations 🙂
Super duper post Radhika!!! I have never tried this method and didn’t quite enjoy the ones I made in an oven as it too ages!! I will definitely give ur method a try, I am sure its a breeze!! Kudos to u for having put the detailed pics with so much patience! Thanks!!
Looks so yummy!! Feel like trying it now itself 🙂
Really a very useful post. Naan looks nice. bookmarked.
wow gr8 dear…really thx for the detailed recipe…..
perfect naans and thanks for taking the effort for stepwise pics
Yummy recipe and thanks for sharing.
superlative- make it almost the same way except for the addition of fresh bread slices; will remember that for my next naans at home.loved the post radhika !
no words other than “wow”. Bookmarked 🙂
who can resist these soft fluffy naans..The pictorial is soo helpful! Soo going to try this soon!
Wow…they looks really soft n tempting,great work n thanks for sharing the detailed recipe with step wise pictures…can’t wait to try it 🙂
Some more doubts ..
Can I use any breads- as we mostly buy whole wheat/grain bread??
Thus the the halogen/coil stove will suit to make this Naan ?? I don’t have gas stove 🙁
awesome recipe dear!!!!
Pakkaa soft soft Naans!!Loving it..
so soft and perfectly made naan!!
Naan looks yummy..:) I love this stove top method of preparation as it makes much more easier..:))
Love it..
Reva
What a description, sweetheart!
I knew either the yeast method or the curd one, but bread+curd is just so new, though I can understand how yeast has partially been incorporated through the bread here. I loved the way you went step-by-step and elaborated just everything you knew. Phenomenal!! 🙂
Yeast free?will try this some time..looks delicious n perfect like the oven made ones!!
Naan looks simply mouthwatering. Lovely preparation dear.
i love the way u have described it step wise and for people like us who have never made naans this is defintiely a stepping stone 🙂 :).. thanks a ton and i m bookmarking this for sure 🙂
Wow! Looks fantastic! I am drooling all over it 🙂
wow, this is too good. Bookmarked !!
now..I’m confident in preparing home made naan..thanks for the awesome recipe dear..;
I love this..I love this radhika.. Very useful notes too. Bookmarking right away.
Lovely Naan…..Thanks for the detailed recipe.
looks wonderful bookmarking
Cann i come by? would love it with some paneer butter masala
Thanks a lot radhika for sharing the stepwise pics and for detailed explanations.Notes are really useful.
Mmmmm….that looks awesome…perfect dhabha style..Very nicely explained pictorials
What a beautiful narration of the recipe along with the pics,Naan looks sooper yummy and almost has restaurant finish …Thanks for sharing this recipe…
Happy Blogging n Enjoy Cooking…..
Perfectly made naans.
Wonderful recipe to have Radhika.I simply loved it.Bookmarked.Thanks.
neat explanations and nice recipe
woww…. want to try dis..but have never done even chapathis by own….pls help me with a simple recipe to soft chapathis….thanks
Looks stunning, well done Radhika, unfortunately i dont have gaz,thanks for sharing this incredible naan.
superb! i think i need to go pick a mesh now soon 🙂
Superb! I think i need to go pick a mesh now 🙂
Hi!
Naan looks mouth watering!!!A must try one!
This looks wonderful. I have never heard of this method before. Love it will try to make naan soon!
awesome! without yeast it looks superb
just tried this RAdhika , although with a slight variation.. will let u know how it comes out…
thanks radhika, lovely dinner. let me try it out.
This comment has been removed by a blog administrator.
This is one keeper of a recipe, for yeast free situations..looks just perfect!
Tempting me ! Will try this for sure !
Hi, Tried & results were really good. I am allergic to yeast.Only made variation using whole wheat flour instead of all purpose flour. Result was fantastic.
Have posted this recipe link on my blog in LINKS.
I’m so glad you like the result. I too make it sometimes with whole wheat flour. Love them both.
I made these naans & the buttered ones along with the panner makhani from your space. You are so right. I’m all in for homemade ones from now on. Came out great and tasted so delicious. Thanks for posting step wise pics that gave me confident to try out Naans at home.
Turned out great!… Thanks…. Had it with butter paneer mutter :)….yummy!
gr8 resipe…thanx 4 sharing….
What an original recipe - I have never seen Naan made with fresh bread crumbs. I am really curious to try. Love this recipe! Thank you for sharing it on RecipeNewZ, it was very popular, so we featured it on our Facebook page. Congrats!
Wow what a recipe i will try soon
very good recipe. without yeast naan looks very tempting. thanks for sharing it. happy to follow you.
This must be the most interesting naan recipe I’ve seen. The naans looks incredibly soft, will give them a try soon and let you know how they came out. Thank you so much for sharing the recipe!
Bookmarked. will try soon 🙂
Thaaaaaaannnnnnkkkkkkk yyyyyooooouuuuuuu. That’s exactly how I feel right now. I cd have hugged u if I cd see u.
Looks so nice I prefer home made naan thank you for posting
mrs.suryakumar
Thank u , its really super
I had never tried with white bread in naan recipe….. seems a very unique ingredient, will definitely try it & let u know……. ur Naan looks very thin & soft …… nicely done ??
Hi Subi, Thank you. using bread is just a round about way of introducing yeast. Not many have a happy experience with yeast and many don’t have it at home either.